
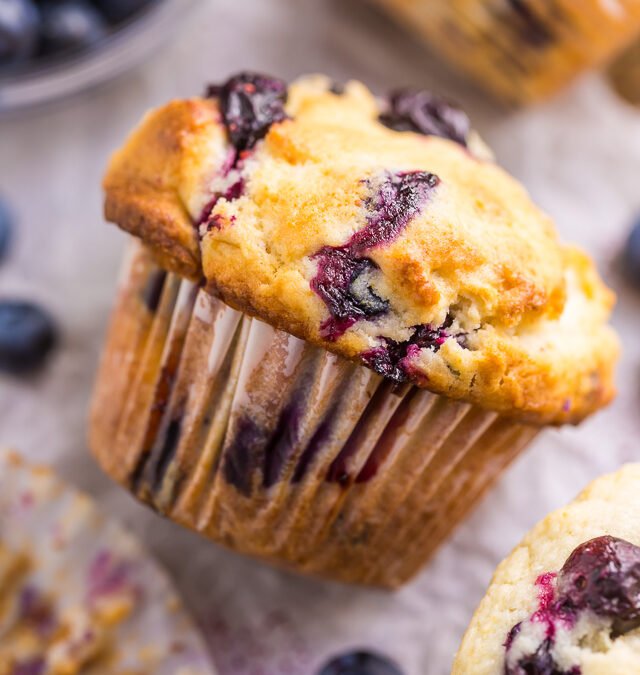
Flour on the counter, one bowl in the sink, and a tray of tall warm muffins half an hour later sounds like a promise only seasoned bakers get to keep. In truth a first batch asks for almost no equipment and forgives nearly everything except stirring for too long. Learn one dependable base batter and a whole shelf of variations opens up. Nothing needs creaming, kneading, or chilling, and the washing up amounts to a couple of bowls and a spoon. Choose a morning when nobody is rushing, preheat the oven before mixing anything, and treat this first tray as practice rather than performance. Even an imperfect batch, eaten warm with butter, teaches more than a week of reading about baking.
What Do You Actually Need Before the Oven Heats Up?
The equipment list is short enough to memorize: a twelve cup muffin tin, two mixing bowls, a whisk, a flexible spatula or large spoon, a measuring set, and a wire rack for cooling. Paper liners spare you greasing and make release painless, though a well buttered tin works fine. An oven thermometer is a worthwhile extra if your oven is old, since dials drift and muffins notice temperature errors quickly. Beyond tools, line up plain flour, sugar, salt, fresh baking powder, eggs, milk, vanilla, and either melted butter for flavor or a neutral oil for an especially tender crumb. Buttermilk or plain yogurt can replace the milk and add a gentle tang along with extra softness.
Check the baking powder before anything else. It weakens quietly in the cupboard, and tired leavening is the most common hidden cause of disappointing first bakes. Drop a spoonful into a little hot water: a lively powder fizzes at once, energetically, while a spent tin barely sighs. Replace any tin that fails, because no technique rescues a batter whose lift has died. This habit of testing and trusting simple checks is the same one behind lessons from baking moist cake successfully, where small preparation steps decide the crumb long before the tin enters the oven. Room temperature eggs and milk also help the batter combine smoothly, so set them out while the oven heats.
Heat the oven early and give it time to truly arrive at temperature, not merely to claim it has. Muffins mixed and then left waiting lose some of their lift, since the leavening starts working the moment wet meets dry. The calm sequence is oven on, ingredients gathered, stir ins prepared, tin lined, and only then batter mixed. Beginners often reverse that order and then rush; laying everything out first turns the actual mixing into a relaxed two minutes.
How Does the Base Batter Come Together Without a Mixer?
Work in two bowls. In the larger one, whisk the dry ingredients together until the salt and leavening are evenly scattered through the flour. In the second bowl, whisk eggs, milk, vanilla, and the melted fat until the mixture looks uniform and glossy. Then pour the wet bowl into the dry bowl in one go. Fold with a spatula, sweeping down, under, and over, turning the bowl as you go, and stop far sooner than instinct suggests. A small number of strokes, somewhere around a dozen, is plenty. The batter should look rough, lumpy, and slightly shaggy, with a few small dry pockets barely disappearing. Smooth batter is overworked batter, and overworking is where tenderness goes to die.
The reason is gluten. Flour plus liquid plus stirring builds the elastic network that gives bread its chew, and chew is lovely in a loaf and wrong in a muffin. Keeping the mixtures apart until the last moment, then combining them briefly, limits that network so the finished crumb stays soft and breaks cleanly. Melted fat helps too, coating flour particles and shortening the strands that form. This two bowl approach, humble as it looks, is the entire technical heart of the method described in the history and forms of the muffin, and it has carried generations of home bakers. Speed matters at the folding stage, not force: decisive, gentle strokes, then hands off.
Stir ins go in at the very end, folded through with two or three final movements so distribution happens without extra beating. Divide the batter with a large spoon or a spring handled scoop, working steadily so every cup gets filled within a minute or two of its neighbor. An even fill matters for even baking, and a scoop makes each portion close to identical without fuss. If one cup ends up shy, rob a spoonful from the fullest rather than scraping the bowl for extra, since the last scrapings are the most overworked part of the batch.
Why Does a Brief Hot Start Give Muffins Their Dome?
Begin the bake fierce and finish it gentle. The tin goes into a strongly hot oven for the first few minutes, and that early blast of heat does two jobs at once: it expands gases inside the batter rapidly, pushing the tops upward, and it sets the outer surface quickly enough to hold that rise in place. Once the domes have formed, lower the heat to a moderate setting and let the centers cook through without the exteriors darkening too far. Opening the door during the opening minutes lets the precious hot air escape and can flatten the whole enterprise, so watch through the glass and trust the timing on a first batch.
Generous filling partners with the hot start. Cups filled nearly to the top have enough batter to crown proudly above the rim, while timidly half filled cups produce neat, flat little cakes that taste fine and look apologetic. Fresh leavening completes the trio of dome makers, which is why how baking powder creates lift in batter deserves a place in every beginner’s understanding: the powder releases its gas in response to liquid and heat, and the hot opening minutes are when that gas must expand. A light shower of coarse sugar over the filled cups before baking adds the crackled, bakery style finish and a pleasant crunch against the soft crumb.
Judge doneness by crumb, not color alone. A thin skewer pushed into the center of a muffin should emerge with a few moist crumbs clinging rather than wet batter or a bare, dry stick. Pull the tin at the crumb stage, since the centers keep cooking gently in the hot pan after removal. Leave the muffins resting in the tin only briefly, a few minutes, then shift them onto a rack. Steam trapped under a muffin left sitting in its cup softens the base, and the rack lets air circulate so bottoms stay as pleasant as tops.
Which Stir Ins Work Best for a First Attempt?
Start with additions that forgive. Chocolate chips are the most forgiving of all: they distribute easily, melt into pockets, and please nearly everyone. Blueberries run a close second and bring color and juice, though they reward one small precaution. Dust berries, chips, or chopped nuts lightly with flour before folding them through the batter. That dry coating gives the pieces grip and keeps them suspended through the crumb instead of sinking into a dense layer at the base. A cup and a half or thereabouts suits a standard dozen without overwhelming the structure.
For a second batch, lemon zest with poppy seeds turns the same base bright and fragrant, while mashed very ripe banana swapped for part of the milk gives a breakfast muffin with natural sweetness and a soft, keeping crumb. Diced apple with a pinch of cinnamon suits colder months, and a savory direction works too: reduce the sugar sharply, fold through grated cheddar and snipped chives, and serve the result beside soup. Change one element at a time during the early batches. When every variable moves at once, nobody learns which change caused the triumph or the disappointment, and learning the base is the whole purpose of a first few trays.
Size is another friendly variable. The same batter baked in a mini tin makes two bite mouthfuls that suit lunchboxes and parties, needing a shorter bake and an earlier check, while a jumbo tin produces towering bakery muffins that want a longer, gentler finish after the hot start.
How Long Do Homemade Muffins Stay Good Afterwards?
Eaten warm on baking day, they are at their peak, but a standard batch of a dozen keeps graciously. Sealed in an airtight container at room temperature, muffins stay good for a few days; a sheet of kitchen paper laid inside the container absorbs stray moisture and keeps the tops from turning sticky. Refrigeration stretches the life to about a week, though the cold firms the crumb, so a brief warm through restores them before serving. Freezing is the long answer: wrap cooled muffins individually, bag them together, and they keep well for far longer, ready to thaw on the counter or warm gently from frozen on a busy morning.
Reviving matters as much as storing. A short stay in a moderate oven brings back the contrast between crisp top and soft middle far better than a microwave, which steams the crumb and can leave it rubbery. Halved and toasted, a day old muffin becomes a different and equally welcome breakfast. Filled muffins with juicy fruit soften faster than plain ones, so freeze fruit batches sooner rather than later if the household will not finish them within a couple of days. Label the freezer bag with the variety and the baking date in plain words, because frozen muffins all look alike by the second week and memory is an unreliable archivist.
What Went Wrong If a Batch Turns Out Tough or Flat?
Toughness with long tunnels running through the crumb means the batter was stirred too long; the fix costs nothing and applies to the very next batch: fewer strokes, lumpier batter, hands off sooner. Rubbery chew points the same way. Flat tops usually trace back to one of three causes: cups filled too shyly, leavening past its strength, or an oven running cooler than its dial claims, each answered by fuller cups, the hot water test, and a thermometer. Pale, soft results often mean the tin came out early, while dark, dry ones stayed too long; the moist crumb test, used honestly, prevents both.
Soggy bases mean the muffins rested in the tin well past their few minutes, steaming themselves from below, and sunken fruit means the flour dusting step was skipped. A sharply peaked top that looks like a small volcano suggests the oven ran too hot overall, setting the crust before the interior finished rising, so ease the temperature down a notch next time. None of these faults reflects on the baker. Each one is information, delivered in edible form, and the second batch built on those notes usually lands so close to right that beginners wonder why they waited so long to start. Keep the notes, literally, on the recipe card: stroke count, oven behavior, and the variation tried. Three batches in, the card holds a personal method no printed recipe can match.

2 comments