Chuck looks stubborn in the package, all tight grain and thick seams of fat, yet hours of gentle moist heat turn that same cut remarkably tender. The transformation happens slowly as connective tissue softens, so rushing the braise only keeps the meat chewy. A heavy pot, a proper sear, and patience through the long middle stretch reward the cook with slices that yield to a fork. Pot roast rewards a cook who plans the finish as carefully as the start, because the meat needs quiet time after it leaves the heat, and learning about resting meat after cooking helps explain why those minutes matter for juiciness. Choose the cut with care, keep the liquid level modest, and resist lifting the lid to peek. Each small decision supports the next, and none of them demands fancy equipment or rare ingredients. A wide heavy pot, a reliable oven or a countertop cooker, salt, pepper, onion, and broth will carry the whole meal.
Chuck Roast and Other Pot Roast Cuts Compared
Chuck comes from the shoulder, a hardworking part of the animal where muscles cross and overlap. That structure leaves the meat threaded with collagen and streaked with fat, both of which suit a long, damp cook. Collagen that feels tough in a quick fry melts gradually into gelatin when held in moist heat, and gelatin coats each fiber so the meat tastes rich rather than dry. Fat inside the muscle bastes from within as it renders slowly. Anyone curious about the dish itself can read the Wikipedia entry on pot roast, which traces how the method became a staple of home kitchens built around one pot and a low oven.
Other cuts can fill the role, though each asks for a slightly different kind of care. Brisket brings deep beef flavor and a loose grain that shreds beautifully, yet its flatter shape cooks less evenly and its leaner sections can turn stringy if the braise runs short. Bottom round is widely available and slices neatly, but it carries far less internal fat, so a modest error in timing shows up quickly as dryness. Short ribs give luxurious results in smaller portions, though they cost more per serving and release a great deal of fat into the liquid. Shank brings abundant gelatin from bone and connective tissue, at the price of awkward shapes and longer picking at the table.
For a first attempt, chuck stands apart because it forgives. A roast weighing about three pounds, fairly even in thickness and well marbled throughout, tolerates an extra half hour without harm and still slices or pulls apart cleanly. Look for bright color, a moderate rim of outer fat that you can trim, and no strong sour smell once the wrapping comes off. Avoid pre-cut stew cubes for a roast dinner, since mixed pieces finish at different rates and never give you the handsome slices or broad shreds that make the dish satisfying. One intact piece, seasoned all over, will always cook more predictably.
Searing Pot Roast Before the Long Braise
A thorough sear does work that simmering liquid never can. Dry the surface well with towels, because surface water must boil away before browning can begin, and a wet roast will steam in the pan and stay pale. Season with salt and coarse pepper on every side, including the edges. Heat a thin layer of neutral oil in the pot until it shimmers, lay the meat in gently, and leave it alone until a deep brown crust forms. Turn only when the meat releases without tearing, then brown the remaining sides, including the narrow ends if the shape allows.
Those browned surfaces add layers of savory flavor to both meat and sauce. The same principle sits at the center of the account of braising on Wikipedia, where searing, liquid, and covered low heat combine as one method rather than separate tricks. Once the roast lifts out, the dark residue left behind becomes the base for everything that follows. Cook sliced onion in that residue until it softens and picks up color, stirring so nothing scorches. A spoonful of tomato paste, stirred until it darkens slightly, adds depth, and a splash of broth loosens every stuck bit when you scrape the bottom with a wooden spoon.
Return the roast to the pot and pour in broth, water, or a blend of both until the liquid reaches partway up the sides, roughly one third to one half of the height of the meat. Full submersion boils the exposed top and dilutes flavor, while too little liquid risks a dry surface and a scorched base. Add a bay leaf or two, a few sprigs of thyme if you have them, and a crushed garlic clove or two. Bring the liquid to a bare simmer on the stove before covering, so the oven or cooker starts from a warm, even base rather than spending its first stretch merely heating the pot.
Oven Braising Versus Slow Cooker Pot Roast Timing
An oven held around three hundred degrees Fahrenheit gives the most control. Heat surrounds the pot evenly, the liquid maintains a gentle simmer without a rolling boil, and you can check tenderness near the end without losing much warmth. A roast of about three pounds usually needs three to four hours at that setting, though thickness matters more than weight alone. Start checking after three hours by sliding a fork into the thickest part and twisting gently. When the fibers separate with little resistance and the internal temperature sits near two hundred degrees Fahrenheit, the collagen has done its work. If the fork meets firm resistance, cover the pot again and give the meat another stretch of time, because firmness at this stage signals an unfinished braise rather than a ruined one.
A slow cooker trades a measure of control for complete freedom during the day. On the low setting, the same size roast generally takes longer than the oven route, often most of a working day, and the sealed lid traps every drop of moisture. That trapped steam softens vegetables faster and produces a milder sauce, yet the meat still emerges tender when the timing is generous. The high setting shortens the wait but can tighten the outer fibers before the center relaxes, so low remains the safer choice when the schedule permits. Whichever appliance you use, start with thawed meat, keep the lid closed for the great majority of the cook, and remember that each lift releases heat and adds time.
The recommendation for a first time cook is clear: buy chuck and braise it in the oven. That pairing forgives small timing errors better than any other combination. Chuck carries enough fat and collagen to stay moist if dinner waits an extra twenty minutes, and the oven lets you watch the pace, adjust the heat slightly, and build the sauce in the same pot afterward. A slow cooker suits a cook who must leave the house, and it will still produce a good meal, but the oven route teaches the method while it feeds people, and the lessons transfer to every braise that follows.
Adding Vegetables to Pot Roast Without Mush
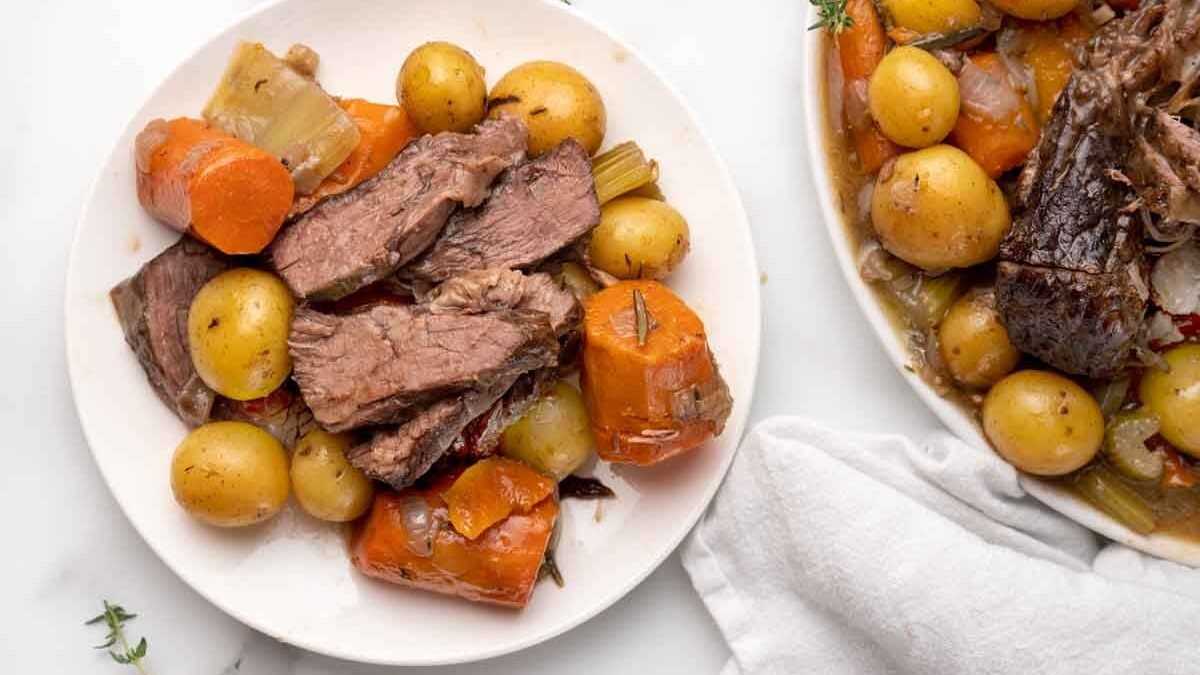
Vegetables added at the very start will not survive the full braise intact. Potatoes, carrots, and onions need heat and flavor from the liquid, but three or four hours submerged turns them soft beyond recognition, and their starch clouds the sauce. The answer is staging. Let the meat cook alone for the first portion of the time, then add large chunks of potato and carrot, plus thick wedges of onion, for the final stretch, roughly the last hour to hour and a half depending on size. Cut pieces larger than you would for a quick stew, since bigger pieces hold their centers while their edges absorb the savory liquid.
Onion behaves a little differently from the roots. Some cooks add a portion early, knowing it will melt almost completely into the sauce and sweeten it, then add fresh wedges later for pieces that hold together on the plate. Parsnips and turnips follow the same late schedule as carrots and welcome the beefy liquid in the same way. Mushrooms, being tender and quick to release water, belong even later, in the closing half hour, so they stay plump rather than shriveled. Green vegetables rarely belong in the pot at all; peas or green beans stirred into the hot sauce just before serving keep their color and a little bite.
Season the vegetables lightly when they go in, because the braising liquid, reduced later, will concentrate its salt. Arrange them around and partly under the meat where possible, so they cook in liquid rather than steaming dry on top. Test a carrot with the tip of a knife: it should slide in with modest resistance, tender but not collapsing. If the meat finishes before the vegetables, lift the meat out to rest and give the pot a short return to the heat, rather than holding tender beef hostage to a stubborn potato.
Resting, Slicing and Saucing the Finished Pot Roast
When the fork test succeeds, lift the roast onto a warm platter and cover it loosely. A rest of about twenty minutes lets the juices, pushed toward the center during cooking, redistribute through the meat, and the fibers relax enough to slice without shredding raggedly unless shredding is the goal. For sliced servings, cut across the grain in thick pieces, watching how the fiber direction changes as chuck muscles overlap. For pulled servings, use two forks and tear along the natural seams, discarding hard lumps of fat and any gristle that never softened.
Meanwhile, turn the braising liquid into sauce. Strain out the spent herbs and any broken vegetable bits, then let the liquid settle so fat rises and can be spooned away, or pour it through a separator if you own one. Simmer the defatted liquid until it reduces slightly and tastes concentrated, then adjust salt at the very end, since reduction intensifies seasoning. A small knob of butter whisked in off the heat adds gloss. If you prefer a thicker gravy, stir a spoonful of flour into softened butter, whisk that paste into the simmering liquid, and cook briefly until the raw taste disappears and the sauce coats a spoon.
Serve the meat moistened with its sauce, vegetables arranged alongside rather than buried, and extra sauce passed at the table. Cooked beef held for serving should stay above one hundred forty degrees Fahrenheit, so keep the platter warm and the sauce at a gentle simmer if guests are delayed. Leftovers need prompt refrigeration in shallow containers, ideally in some of their cooking liquid, which protects the meat from drying when reheated. Reheat gently, covered, with a splash of liquid, until steaming throughout. Properly handled, the second serving often tastes deeper than the first, as the gelatin-rich sauce settles into every fiber overnight.