
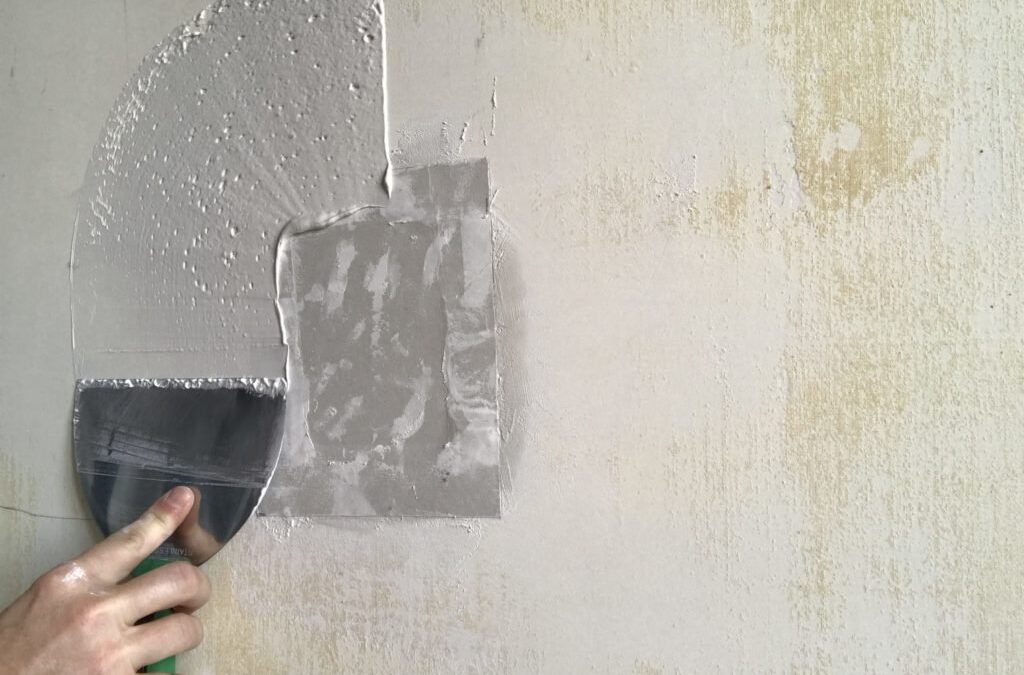
A hole in drywall has a way of looking worse than it really is, especially when it is too wide for filler and too small to justify opening the wall to the studs. That middle ground is exactly where the self supporting patch earns its keep. Instead of hunting for backing timber, the patch carries its own paper flange that bonds flat to the wall face. Handled patiently, the repair vanishes under paint. Rushed or overloaded with compound, it telegraphs through every coat.
Three Honest Ways to Close a Hole This Size
Every drywall hole offers the same three honest routes, and choosing between them is mostly a matter of size. Filler alone suits dents and small punctures, the sort a door handle leaves, because filler has no strength of its own and relies on the board around it. Past roughly the width of a thumb or two, filler sags, shrinks and cracks, and a repair that should have taken an afternoon becomes a recurring weekend chore.
At the other end sits the backed repair: cutting the opening square back to the studs, fixing a piece of timber or a fresh section of board to solid framing, taping the joints and finishing as if building new wall. That route is right for large damage, for holes near corners, and for anywhere the wall takes knocks or carries weight. It is also slow, dusty and wildly oversized for a hole left by a slipped drill or a moved picture hook.
Between the two sits the paper flange patch, sometimes called a California patch or a hot patch, and for a mid size hole it is the recommendation here, stated plainly. It asks for no backing, no clips and no opening of the wall, yet it finishes as genuine board rather than hardened filler. Readers weighing the do it yourself route against paying for the repair can compare their time and materials with the cost to patch drywall holes when the work is done professionally, and for most households the saving from doing this one well is real, since the materials involved sit in a modest price range while labour is what a professional invoice mostly charges for.
What Makes the Paper Flange Method Hold Itself Up
The mechanics are simple once seen clearly. You cut a piece of board larger than the hole, then score the back of the piece and snap the gypsum away along the cut, leaving the front paper intact as a wide border around a central plug of board. The plug drops into the hole and fills it with real material at the right depth. The paper border, buttered with compound, presses flat against the wall face around the hole and bonds there, holding the plug exactly where it belongs.
That paper border does the work that tape does on an ordinary joint. It bridges the seam between plug and wall, spreads the bond over a wide area, and flexes just enough to tolerate the tiny movements a house makes with the seasons. Because the flange sits on the surface rather than building up layers inside the opening, the finished repair can be feathered almost perfectly flat, which is the entire battle with patches of any kind.
Honesty about size limits matters. The method carries holes up to roughly the span of a hand and a half comfortably, provided the surrounding board is sound and dry. Beyond that, the plug grows heavy enough and the span wide enough that the paper alone should not be trusted, and the backed repair takes over. Wet board, crumbling edges or damage at a corner also disqualify a hole, whatever its size, because the flange bonds to the wall face and a weak face means a weak repair.
One quiet advantage of the flange method deserves spelling out, because it decides many real world choices. The repair needs no access behind the wall, no knowledge of where the studs run, and no fixings at all, which makes it ideal in finished rooms where opening the wall would disturb wiring, insulation or pipework nobody wants to meet by surprise. It also reverses gracefully. If a patch ever has to come out for access later, it cuts free cleanly at its seams, unlike a backed repair that must be demolished. For a single mid size hole in a sound wall, few methods ask so little and return so much.
Cutting and Folding the Patch So the Plug Fits Snugly
Start by squaring the hole. Ragged edges tear paper and leave whiskers that print through compound, so trim the opening into a clean rectangle with a utility knife or a small saw, checking as you go that nothing loose remains. Measure the opening, then cut your patch piece larger than it by a healthy margin on every side, since that margin becomes the flange. Mark the shape of the opening on the back of the patch piece, centred, so the plug will match the hole it must fill.
Score along those marked lines on the back of the board, cutting through the back paper and into the gypsum without touching the front paper. Snap each scored section away and peel the gypsum off the front sheet carefully, working from the edges, until only the paper flange remains around the plug. A little torn paper on the back of the flange is no disaster, but a cut through the front paper ruins the piece, so score with a light hand and let the snap do the work.
Dry fit the plug before any compound appears. It should seat into the opening with light finger pressure, sitting flush or a whisper below the wall face. A plug that needs forcing will bow the flange and print a ridge; a plug that rattles loosely will sink and crack its edges. Trim slivers from the plug or the opening until the fit is snug and calm, and brush away every crumb of gypsum dust, because dust between flange and wall weakens the bond that the whole method depends on.
Tools for the whole job fit in one hand: a utility knife fitted with a fresh blade, a tape, a pencil, a wide flexible knife for spreading, a narrower one for bedding the flange, and a sanding block. Compound choice matters more than tool choice. A setting type compound gives a harder, less shrink prone first bed for the flange, while an ordinary ready mixed compound sands more kindly for the finishing coats, and many careful workers use the first for bedding and the second for finishing. Either way, keep the compound clean, because one crumb of dried material dragged under a knife scores a line through every coat that follows.
Thin Coats, Wide Feathering and the Patience Between Them
Spread compound over the paper flange’s underside, evenly right to the edges, then press the patch home and draw a wide knife over the flange, working firmly outward from the centre. Compound should squeeze out slightly at the edges; wipe that excess away and keep stroking until the paper lies dead flat with no bubbles trapped beneath. This first bedding matters more than anything that follows, because a flange that starts flat can be finished flat, and one that starts lumpy cannot.
From here the work is thin coats and patience. The guidance published by United States Gypsum on its joint compounds treats thin, fully dried coats as the basis of a smooth finish, because thick coats shrink as they dry, and shrinking compound cracks, sinks and drags the surface down with it. Spread each coat wide, feathering the edges out well beyond the flange so no ridge survives to catch the light, and let every coat dry completely before the next touches it.
Sand lightly between coats with a fine block, just enough to knock down nibs and knife lines, and wipe the dust away before recoating. Judge the surface with your palm as much as your eyes; a flat patch feels like one continuous wall under a sliding hand. Most patches of this size want a few coats spread across a day or two rather than one heroic mound in an hour, and that unhurried rhythm is the real difference between a repair that vanishes and one that announces itself.
Why Patches Flash Through Paint and How Priming Stops It
A patch can feel perfectly flat and still betray itself the moment paint dries, appearing as a dull island in a glossier sea. That effect is called flashing, and it happens because dried compound is porous and drinks paint in, while the surrounding wall face does not. The encyclopedia entry on drywall describes how the board is made of a gypsum core faced with paper, and that paper face is exactly why the untouched wall takes paint evenly while bare compound, with no paper skin, takes it thirstily and dries to a different sheen.
The cure is a coat of primer over the dried patch before any paint goes on. Primer seals the porous compound so it accepts the topcoat at the same rate as the paper faced wall around it, and the patch disappears in colour and sheen alike. Skipping primer and going straight to paint is the single most common reason careful patches get unfairly blamed, and it costs only a few minutes to avoid. Prime generously, feathering the primer a little beyond the feathered compound, and let it dry fully.
Before priming, inspect the patch under raking light: a lamp held low and to one side, so its beam skims across the wall and throws every ridge and hollow into shadow. What raking light reveals, one more wide skim coat usually fixes, spread thin and feathered far. Only when the skimmed surface passes that harsh test, and the primer has unified the surface, should the final paint be trusted to hide the repair completely.
When the paint has dried and the room is back in ordinary light, step back and look at the wall the way a visitor would, from the doorway and from across the room, rather than from the close range where you worked. A patch that survives that honest viewing has truly vanished. Keep the leftover compound sealed and note the paint used, somewhere in a drawer or a phone note, because walls collect new wounds over the years and the next repair, whenever it comes, starts faster with the method fresh in mind and the materials already matched.


One comment