
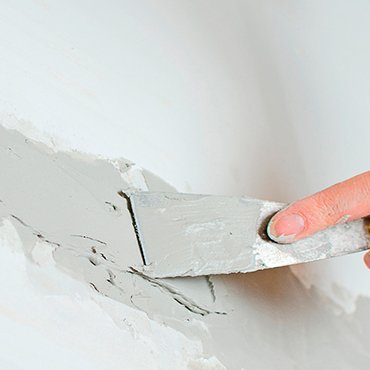
A repaired wall betrays itself through light long before colour gives it away, because shallow ridges and smooth islands catch shadows differently from surrounding plasterboard. Invisible work therefore depends on feathering compound far beyond the damage and recreating whatever texture already lives there. Small dents, swinging door damage, and gaping rectangles each demand a different structure beneath the surface. Build that structure patiently, prime honestly, and even strong sidelight struggles to find the repair afterwards.
Tiny Nail and Screw Holes Filled in Thin Pressed Layers
The smallest damage asks for the least material and the most restraint. A nail hole or a screw hole is a narrow void with sound board around it, and the repair succeeds by filling that void flush rather than by building a mound above it. Compound pressed firmly into the hole with the edge of a flexible knife fills from the bottom upward, and the same stroke wipes the surrounding surface nearly clean, leaving almost nothing to sand once the fill has dried.
Thin layers matter because the paste shrinks slightly as it hardens. Reference material on joint compound explains that the paste fills seams and holes and hardens as it dries, often shrinking slightly in the process, and a deep single fill therefore sinks below the surface and leaves a shallow dimple behind. Two thin pressed layers, each allowed to dry fully before the next arrives, end flush where one thick layer ends sunken, and the second layer needs only a small amount of material.
Preparation for tiny holes takes moments and decides the finish. Loose paint edges and raised paper burrs around a hole should be pressed flat or trimmed away first, since any raised edge telegraphs through the fill and catches light later. A quick wipe removes dust that would weaken the bond. Old screw holes from removed fittings deserve the same care, along with a check that nothing behind the board will push the fill back out over the following days.
Sanding tiny fills should be brief and gentle. A fine abrasive worked lightly over the dried patch levels the last trace of excess, and a hand passed slowly across the area judges the result better than eyes in flat light. The surface should feel like one continuous plane under the palm, with no ridge at the edge of the fill and no dip at its centre.
Paper Flanged Plugs for Doorknob Sized Damage in Walls
Doorknob damage sits in an awkward middle ground. The hole is far too large for filler alone, since compound without support behind it cracks and sinks, yet the surrounding wall is usually sound and the opening is modest in size. The paper flanged plug answers this middle case elegantly, by cutting a fresh piece of board slightly larger than the damage and using its own facing paper, left attached around the edges, as the bonding flange that marries plug to wall.
The method suits anyone already comfortable with the simpler end of this work. Experience gained while patch hole drywall repairs on a budget are tackled at home bridges the gap between tiny filler work and the fully stud backed reconstruction described later in these pages. The smaller repair teaches knife control, thin coats, and patience with drying, and the flanged plug builds directly on those habits while adding one new skill, which is cutting a plug that fits its opening closely on every side.
The board itself deserves a plain introduction. Reference descriptions present drywall as a panel made of gypsum plaster pressed between thick sheets of paper, widely used for interior walls and ceilings, and the drywall panel construction and uses overview sets out how that layered structure behaves when cut. The paper faces carry much of the panel strength and smoothness, which is exactly why the flange method works, because it preserves a paper face across the repair and bonds paper to paper around the rim.
Cutting and fitting decide whether the plug disappears. The damaged area is squared with clean cuts, the plug is shaped to match with a small margin for adjustment, and the flange paper is scored and folded so the plug sits flush while the paper spreads flat against the wall around it. A bed of compound behind the flange bonds the assembly, the knife presses out excess and air, and the seated plug should sit level with the surrounding surface rather than proud of it or sunk below it.
Drying patience completes this middle repair. The flange and its bonding coat must harden fully before any further compound is feathered over the seams, because loading wet work with more wet work traps softness inside the patch. Once hard, a wide thin coat over the flange edges hides the transition, and the repair gains the same flat, quiet surface as the tiny fills, only across a far larger area that once held a hole a hand could pass through.
Stud Backed Rectangles and Wide Feathered Compound Coats
Large damage changes the problem from filling to rebuilding. A gaping rectangle left by plumbing access, impact, or removal of a fitting has no support within itself, and compound stretched across open air will fail. The answer is structure first, in the form of a backing piece fixed to the studs or secured behind the opening, giving the new board something solid to fasten against so the patch behaves like wall rather than like a drum skin.
The replacement rectangle is cut to sound board on every side, since damaged, soft, or cracked edges cannot hold a seam. Fixing the patch firmly matters more than fitting it tightly, because a patch that flexes under a palm will crack its seams within the season. Screws drawn just below the paper surface without tearing it give the compound dimples to fill, and the finished assembly should feel as unyielding as the untouched wall beside it when pressed.
Feathering then performs the invisibility. The material used here is the same paste described in reference writing on joint compound, which explains that it fills seams and holes and hardens as it dries, and the joint compound properties and drying behaviour overview covers why thin coats behave better than thick ones. Each coat spreads wider than the one before it, so the finished patch rises and falls over a long, gentle distance that light cannot catch, rather than over a short edge that shadows will outline.
Width is the whole secret and the part beginners resist. A coat that ends a hand span beyond the seam still shows under raking light, while a coat feathered two or three times that distance dissolves into the wall. The knife is held flatter with each pass, pressure shifts toward the outer edge, and the centre keeps only the material needed to bury the seam and the screw dimples. Anything more becomes sanding work created by the knife itself.
Between coats, restraint rules again. Each layer dries completely before the next begins, edges are knocked down lightly where they ridge, and dust is cleared so the fresh coat bonds to the last rather than to powder. Rushing this rhythm builds a patch that looks finished in the morning and maps its own outline by evening. Taken slowly, the same patch becomes boring to look at, which is the highest praise a wall repair can earn.
Texture Blending Sanding Under Raking Light and Priming
Flat compound on a textured wall announces itself as surely as a ridge does. Most walls carry some surface character, from a faint orange peel stipple to a heavier hand worked pattern, and the repair must borrow that character before painting begins. Matching texture is done with the application tool itself, by stippling, dabbing, or rolling compound in the manner that produced the original surface, practised first on scrap board until the match looks convincing at arm length.
Sanding shapes the transition between old and new. A wide, light pass with fine abrasive softens the feathered edges into the surrounding board, while heavy pressure in one place digs hollows that later light will expose. The hand remains the senior inspector throughout, sweeping across the patch and its borders in several directions, because fingertips register steps and swells that eyes under ordinary ceiling light simply miss during the working day.
Raking light settles every argument about readiness. A lamp or torch held low and close to the wall, shining along the surface rather than at it, throws every ridge, dip, and sanding scratch into stark relief. Defects that hide completely under normal lighting stand out as shadows under this cruel angle, and the time to find them is now, with compound and abrasive still at hand, rather than after paint has sealed them into permanence.
Priming is the step whose absence haunts finished rooms. Unprimed compound absorbs coating differently from surrounding board, which can leave a dull patch showing through later layers even where the surface is perfectly flat. A coat of primer over the repair equalises that absorption, seals the dusty compound, and gives the finish paint one consistent ground to cover.
Painting Wall to Wall So Repairs Vanish From View
Painting only the patch invites a final betrayal, because even matched paint differs slightly from aged paint around it in sheen and depth. Painting the whole wall, from corner to corner and skirting to ceiling, lays one fresh surface over repair and original alike, and differences in age and absorption disappear under that single coat. Natural break points at corners hide the boundary between painted and unpainted walls in adjoining sections of the room.
Two thin coats serve better than one heavy coat. The first coat over primed compound can look patchy while it dries, and judgement should be reserved until the second coat has settled, since colour depth evens out as the full film builds. Rolling in consistent sections with a loaded roller keeps the texture of the paint film uniform, and a uniform paint texture matters because the eye reads sheen variation as surface variation even on a truly flat wall.
Light the finished wall cruelly one more time before calling the work done. Stand where daylight enters, then check again under evening lamps, since repairs have a habit of appearing under one kind of light after hiding under another. A patch that survives morning sun along the wall, afternoon flatness, and warm lamplight has earned the description invisible, and anything less sends the worker back to feathering rather than to apologies.
Care afterwards protects the investment of patience. Fresh compound and paint harden fully over days rather than hours, so leaning furniture, picture hooks, and knocks should wait until the wall has gained its full strength. Door handles that caused the original damage deserve a stop behind them, fitted quietly, so the repaired section is never tested by the same swinging blow. The wall then returns to its proper role in the room, which is to be looked past rather than looked at.


