
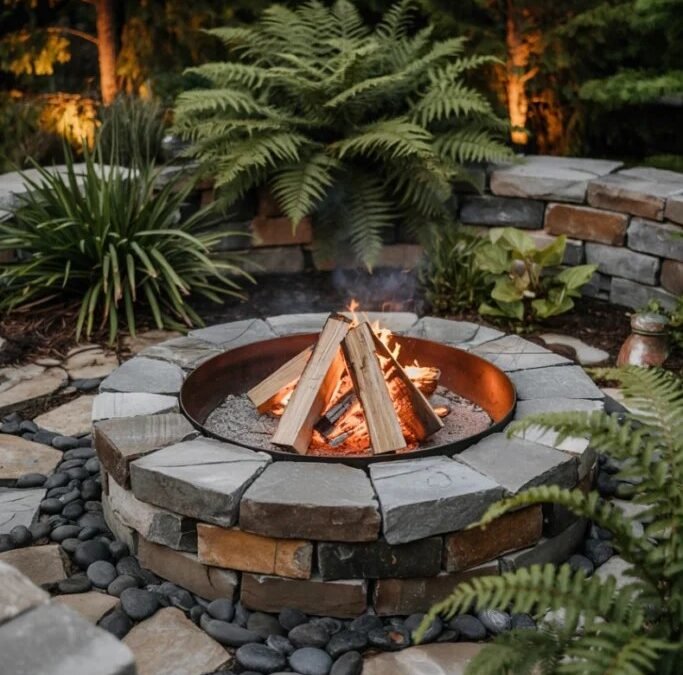
Building a backyard fire feature on a tight budget succeeds or fails long before the first block is stacked. A short readiness list covering permission, placement, and heat safe materials keeps spending focused where safety actually lives. Money spent in the wrong order creates a familiar problem: a neat ring of blocks sitting in a spot the local rules never allowed, built from stone that cracks the third time it gets properly hot. Reversing that order costs nothing. Permission comes first, placement second, materials third, and only then does building begin. Everything that follows works through that sequence slowly, because a modest pit assembled patiently will still be sound, level, and welcome years after a rushed bargain build has slumped, stained, or been ordered removed.
Fire Pit Readiness Checklist Before Any Money Leaves Your Pocket
Picture the readiness list as a row of gates, each one opening only after the previous gate closes. Gate one is permission: telephone the municipal office or fire service, ask whether open burning is allowed at the address, whether a permit is needed, what setback from buildings and boundaries applies, and whether dry weather brings seasonal bans. Write the answers down, because memory softens rules. Gate two is placement: walk the garden at the hour gatherings usually happen, notice where evening air drifts, where children run, where roots and buried services might sit, and where sparks could travel. Gate three is materials: heat rated blocks or a steel bowl, gravel for the footing, sand or fire rated fill for the interior, and nothing porous, painted, or salvaged from a demolition pile. Gate four is tools: a spade, a rake, a spirit level, a tamper or a heavy flat stone, gloves, and a wheelbarrow. Gate five is the safety kit that lives beside the pit permanently: a mesh spark screen sized to the opening, a bucket of water, a bucket of sand, a long handled shovel for ash, and a clear rule that flames never burn unattended.
Running through those gates on paper reveals the true shape of the budget before a single delivery arrives. Gravel bought once and shared with a path or a neighbour stays cheap. Plain retaining blocks bought during seasonal clearance stay cheap. Delivery fees, by contrast, quietly eat the savings, so combining orders or collecting materials in one trip protects the total. Two items refuse every shortcut. The spark screen contains the embers that otherwise land on dry grass, sleeves, and decking, so it gets bought at full quality even when money is tight. The heat rated interior lining absorbs punishment that would split ordinary masonry, so it also stays off the bargain list. Everything decorative, from capstones to coloured gravel, waits until the working pit has proved itself through a season of ordinary use.
Clearance, Wind, and Overhead Cover When Choosing the Pit Spot
A good spot reads the whole garden rather than the empty patch in the middle. Flames need breathing room on every side: room from fences that could scorch, from sheds storing fuel, from hedges that dry out in summer, and from the house wall where smoke stains siding and drifts through open windows. Look upward as carefully as outward. Low branches, pergola roofs, washing lines, and awnings all sit within reach of rising heat and stray sparks, and heat damage often appears weeks later as brittle leaves or warped fabric rather than on the night itself. Ground matters too. A hollow collects rainwater and turns ash into grey sludge, while a slope sends rolling logs and tipping chairs into every gathering, so a level area on firm, drained soil wins over a pretty corner that fights back.
Wind decides where smoke spends the evening. Stand in the candidate spot on several breezy days and watch which way leaves and loose grass travel, then place seating on the sheltered side and the pit where drifting smoke crosses open ground instead of a neighbour boundary or a patio door. The surrounding entertaining area deserves the same attention as the pit itself, since guests settle across decking and paving while one person tends the fire. Tidying that wider zone, scrubbing boards, and understanding power washing a deck surface properly before the season starts keeps the whole setting feeling cared for rather than focused on a single ring of blocks. Leave a clear walking route from house to pit as well, wide enough for someone carrying logs in the dark, and keep that route free of hoses, toys, and planters that catch ankles.
Block, Bowl, and Gas Options Weighed for Cost and Care
Three families of build cover nearly every modest budget. Stacked retaining blocks form the classic ring: forgiving to assemble, easy to rebuild when a course shifts, and repairable one block at a time when heat finally wins. A steel bowl set into a simple surround suits renters and small gardens, lifting for cleaning and storing under cover through winter, though thin metal eventually rusts and warps. Gas designs fed by propane or a fixed natural gas line trade the ritual of firewood for instant flames and cleaner air, which suits streets where wood smoke draws complaints or local rules restrict open burning, while asking more money upfront and needing sound connections checked with care. Anyone weighing these routes against older traditions can read a broad overview of fire pit construction and use that traces designs from simple ground rings to built garden features, then match those patterns against local rules and the size of the space available.
Care separates the options as sharply as price. Block rings ask for occasional relevelling, a brushed interior, and replacement of any block that crumbles at the edges. Bowls ask for ash removal while the metal stays sound, plus dry storage so rust never gets a winter to work in. Gas units ask for burner ports kept clear, hoses inspected for cracks, and connections tested before the season rather than during a party. Choosing honestly means picturing a wet November evening, not a perfect June one, and asking which design still feels inviting when the weather turns ordinary.
Levelling a Gravel Footing and Stacking Courses That Stay Put
Construction begins with a circle marked honestly. A stake at the centre, a length of string, and a stick of chalk draw the outer edge, then the turf inside that line comes up and the soil beneath gets dug down to firm ground. Soft topsoil compresses unevenly under weight and heat, so digging continues until the spade meets resistance. Gravel fills the excavation in shallow layers, each layer raked flat and tamped hard, building a footing that drains rainwater away from the base instead of holding it against the blocks. Drainage earns its keep in winter, when trapped water freezes, expands, and heaves a course out of line. A spirit level laid across a long straight board checks the gravel bed in several directions, and low corners receive more gravel rather than hopeful packing with loose soil.
Stacking rewards patience over speed. The first course sets the truth for everything above it, so each block gets seated, tapped, checked, and adjusted until the ring closes without a wedge or a wobble. Later courses stagger their joints across the course below, the way brickwork spreads load, and each new block is brushed clean before placement so grit never holds faces apart. Step back often. Eyes forgive small errors at arm length that glare from across the garden, and correcting course two takes moments while correcting course five means unbuilding. Leave the ring to settle through a few days of weather before the first fire, then recheck level and reseat anything that moved. A ring that survives settling, rain, and one careful small fire has earned larger flames.
Interior Fill and Spark Control for Safer Everyday Burning
Inside the ring, the floor of the pit decides how fire behaves. A bed of coarse sand or gravel over the footing gives logs a stable seat, catches falling embers on a surface that cannot burn, and keeps ash removal simple with a shovel. Heat rated lining blocks or a steel insert protect the structural ring where flames lick hardest, because porous stone and ordinary masonry trap moisture that flashes to steam under intense heat, cracking faces and spalling fragments into the fire bed. Leave air room around the fuel stack: logs leaned in a loose cone or crossed grid burn brighter and cleaner than a dense heap, which smoulders, smokes, and tempts people to add liquid fuel, a habit that belongs nowhere near any fire.
Spark control continues after the flames settle. The mesh screen goes on whenever children circle close, whenever wind freshens, and whenever the fire burns down to lively embers that pop without warning. Seasoned dry hardwood supports all of this, giving strong heat with comparatively little smoke, while painted timber, pressure treated offcuts, and glossy printed board release harmful compounds and stay out of the pit entirely. Water and sand stay within arm reach from lighting until the final check, not stored in a shed across the garden.
Burn Habits, Ash Handling, and Storage Between Gatherings
Good evenings end with a routine as fixed as the building work. Flames die down naturally while someone stays present, then embers get spread thin with the shovel so heat leaves them faster, and water or sand settles over anything still glowing. Ash looks harmless hours before it actually becomes harmless, so the test stays tactile and patient: stir the bed, wait, and only treat the pit as cold once ash feels cool through the back of a careful hand held close above it. Cold ash travels to a metal container with a lid, stored away from fences and bins, because a single buried ember can smoulder quietly for a very long time. Readers wanting cleaner smoke for neighbours and lungs can follow the Burn Wise programme on cleaner wood burning published by the Environmental Protection Agency, which explains dry fuel choices, proper seasoning, and burning habits that cut visible smoke without cutting warmth.
Between gatherings, storage protects the investment better than any accessory. The screen lives on the pit or hangs dry in a shed, blocks get a quick visual pass for new cracks, and the gravel bed gets raked level so the next fire starts on order rather than rubble. Firewood stacks under cover with air moving through it, off the ground, away from the house wall where pests travel. Treated this way, a modest ring of blocks, gravel, and patience delivers season after season of evenings, and the readiness list that opened the project remains taped inside a kitchen cupboard, ready for the day a larger design tempts the household.


2 comments