
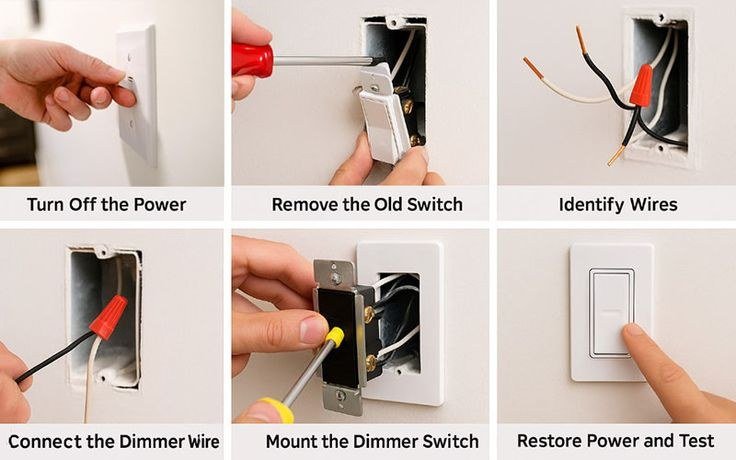
Swapping a plain switch for a dimmer is a small job with one large trap: bulb and dimmer compatibility decides whether the result glows smoothly or buzzes. A pre work checklist covering ratings, wiring type, and testing keeps the swap brief and safe. Most failures blamed on faulty hardware trace back to a skipped item on that checklist, usually a lamp that was never designed to dim or a load total nobody added up beforehand, so ten unhurried minutes of preparation protect the entire project.
Dimmer Swap Checklist Covering Compatibility, Tools, and Ratings
The checklist begins with pairing, because a dimmer and its lamps must suit each other before any other detail matters. Confirm that every lamp on the circuit carries a dimmable marking, and choose a dimmer rated for diode and compact fluorescent loads rather than an older filament only model whenever modern low energy lamps are involved. Add the wattage of every lamp the switch controls, expressed in words on a notepad if memory feels crowded, and keep that combined figure comfortably below the lower rating printed for modern lamp types, since makers allow far less total load for diode lamps than for filament bulbs on the same unit.
Next, identify the switching arrangement by counting how many switches operate the fitting. A single controlling switch means a single pole dimmer, while two controlling switches mean a three way circuit where only one position receives the dimmer and the other keeps a plain switch. Gather tools before touching anything: a non contact voltage tester, insulated screwdrivers, wire connectors, electrical tape, a phone or camera for recording connections, and a torch for peering into a dark box. Finish the checklist at the consumer unit, locating the correct breaker, switching it off, taping a note over it so nobody restores power mid task, and planning to prove the circuit dead at the switch itself rather than trusting the breaker label alone.
Spares and boundaries belong on the checklist too. Keep a couple of spare connectors, a short length of tape, and the old switch itself within reach until testing finishes, because a swap that misbehaves can be reversed cleanly only while every original part remains available. Draw a firm line around scope at this stage as well: work inside the consumer unit or distribution board stays with a qualified electrician, and the home task covers only the switch position on a circuit already isolated at the breaker. Deciding that boundary calmly at the kitchen table, rather than improvising beside an open box, keeps the project proportionate to its modest rewards.
Time expectations belong on the checklist as well. A standard single pole swap in a roomy box is a short job for most home workers, often wrapped up within a relaxed half hour including testing, while three way wiring, a crowded box, or unfamiliar older cabling can stretch the session considerably longer. Planning for the slower outcome keeps work calm, and calm work around conductors always outperforms hurried work, especially during the reconnection stage where one transposed wire creates flicker or a dead fitting.
Matching Dimmer Electronics to Modern Low Energy Bulbs
Older dimmers control brightness by chopping the supply in a manner filament bulbs tolerate gracefully, glowing warmer and dimmer without complaint. Modern low energy lamps contain driver electronics that interpret that chopping very differently, and a mismatched pairing produces the familiar trio of faults: flicker at low settings, audible buzzing from lamp or plate, and a dimming range that collapses into a narrow band between bright and off. Selecting a dimmer designed for diode loads, ideally one whose maker lists tested lamp families, removes most of that behaviour before installation begins.
Control style adds another layer to pairing, since some dimmers clip the rising portion of each supply wave while others clip the falling portion, and lamp drivers often favour one approach over the other. Packaging and maker literature usually declare which style a unit uses and which lamp families passed testing on it, so a few minutes reading those declarations in the shop aisle can prevent a wall full of shimmering downlights. Where a fitting uses a separate transformer or driver, such as certain low voltage downlights, that component joins the compatibility question as well, and replacing an ageing driver alongside the dimmer often cures faults that a switch swap alone leaves untouched.
Low end behaviour deserves attention because many households dim mainly toward evening levels. A small trim adjustment fitted to many modern dimmers raises the minimum output slightly, steadying lamps that shimmer or drop out near the bottom of the travel. Setting that trim after installation, with lamps warmed and the room dark, turns a temperamental lowest setting into a calm glow. Mixing lamp brands on one circuit can still unsettle performance, since drivers respond unevenly, so fitting identical lamps across a multi bulb pendant or downlight group gives the dimmer a consistent load to manage.
Single Pole and Three Way Wiring Patterns Recognised Early
Recognising the wiring pattern before purchase prevents a wasted trip and a half finished wall. A single pole switch carries a feed conductor and a switched conductor, sometimes with a neutral looped through the box and sometimes with no neutral present at all in older installations. A three way arrangement adds traveller conductors linking two switch positions, so the box behind the chosen dimmer location holds more cores and the companion switch across the room must remain compatible with the new arrangement.
Conductor colours and markings vary by era and region, and older homes occasionally reveal cloth insulation, brittle sheathing, or aluminium branch wiring. Aluminium demands special connectors and professional handling rather than ordinary joining methods, so discovering it ends the home attempt and turns the project into a call to an electrician. Brittle insulation that cracks when a conductor flexes carries the same message, because disturbing such wiring further creates hazards that a new dimmer cannot justify. Photographing the existing connections before loosening anything preserves a reliable map of the pattern, whatever its age, and gives a professional something clear to work from if the job changes hands.
Removing the Old Switch After Photographing Every Connection
Removal starts only after the tester proves every conductor in the box dead, touching the probe to each terminal and to a known live source beforehand to confirm the tester itself works. Ease the old switch forward gently, supporting stiff conductors rather than levering against them, and photograph the arrangement from several angles with labels or tape flags on any wire whose role feels uncertain. Those images settle arguments with memory later, because conductors that looked obviously distinct on the wall can appear identical once disconnected and dangling.
Reconnection follows the dimmer maker instructions for the identified pattern, pairing conductors to the correct leads or terminals and securing each joint firmly inside an approved connector. Home workers who want the underlying habits rehearsed plainly can follow replacing a light switch safely as a beginner for a companion walkthrough of switch handling and testing discipline. Tug each finished connection lightly to confirm grip, dress earth conductors to their terminal without exception, and keep bare copper fully enclosed so no exposed length can touch a neighbouring terminal when the unit folds back into place.
Folding Conductors Into a Crowded Box Without Strain
Dimmer bodies run deeper than plain switches, so box space becomes the quiet challenge of the whole swap. Folding conductors in smooth concertina bends, rather than sharp creases, lets the unit settle back without forcing terminals against the box walls or pinching insulation under a mounting screw. Bundling related conductors together with their connectors tucked toward the rear keeps the front clear for the dimmer body, and trimming excess length sparingly preserves enough slack for future work while removing the surplus that causes crowding.
Where a shallow box simply refuses the deeper unit, options include a surface pattress that adds depth, a slimmer dimmer model, or professional help to deepen the installation safely. Forcing a unit home against springy conductors invites loosened joints and intermittent faults that appear weeks later as mysterious flicker. A plate that sits flat against the wall, with screws snug rather than strained, signals a comfortable fit, while a plate bowing outward or screws pulling sideways warn that the conductors behind need rearranging before power returns.
Full Range Testing for Flicker, Hum, and Excess Warmth
Testing begins with power restored and lamps cold, travelling slowly from off to full brightness and back down again while watching for shimmer, strobing, or lamps that extinguish before the control reaches its lowest stop. Listen at the plate and at each fitting for hum that rises at particular settings, since persistent buzzing points back toward pairing or load questions rather than installation neatness. Background on the control electronics behind these behaviours appears in dimmer technology and control methods describing how modern units shape the supply delivered to a lamp.
Recording the outcome while details remain fresh helps any future work on the same circuit. Note the dimmer model, the lamp type fitted, the trim position chosen, and the breaker number on a card kept near the consumer unit, and keep the removed plain switch in a labelled bag rather than discarding it immediately. Should a later lamp change introduce flicker, that record separates a pairing problem caused by the new lamps from an installation fault, saving a reopened box and a round of guesswork. A photograph of the finished plate and the settled trim setting rounds out the record neatly.
Warmth checks complete the assessment after the fitting has run at full brightness for a while. A plate that feels mildly warm under a heavy load can be normal, but heat that feels pronounced through fingertips means the combined lamp total needs rechecking against the rating for modern lamp types, or the pairing needs revisiting. Anyone wanting the wider wiring picture behind single and multi position control can consult light switch types and wiring overview covering the arrangements found across homes of different ages. A swap that glows evenly, stays quiet, and leaves the plate comfortable to touch has passed every meaningful test, and the room gains adjustable light for evenings, meals, and films from a modest afternoon of careful work.


