
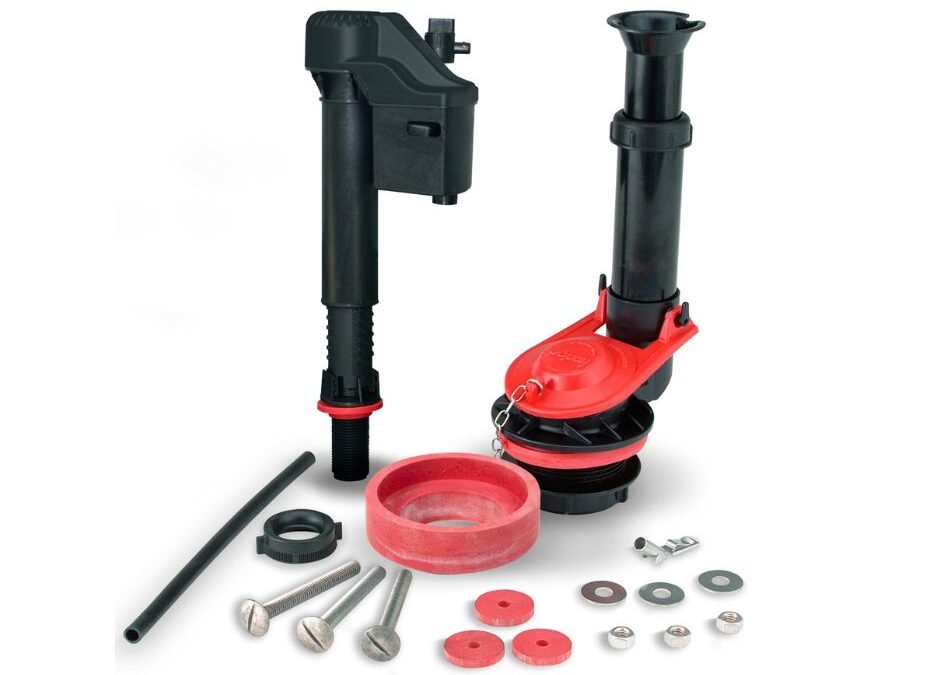
Hearing a cistern refill itself at random through the night points to a small failure hiding inside the tank. Water slips past a worn seal or a valve sits slightly out of adjustment, and the system keeps topping itself up in response. Diagnosis takes patience rather than strength, and most corrections involve inexpensive components handled with basic tools. Quiet returns surprisingly quickly once the actual culprit has been identified. Start by lifting the lid, setting it somewhere safe, and simply watching one full cycle without touching anything, because observation separates a leaking seal from a filling fault faster than guessing.
Tracing Phantom Refills to Tank Parts That No Longer Seal
Inside the tank, only a handful of parts can allow water to escape or enter at the wrong moment. A flexible seal at the base holds the stored water back until a flush lifts it, and age, mineral crust, and cleaning chemicals gradually stiffen or warp that rubber. Once its edge no longer sits flat, a thin stream escapes continuously into the bowl, the water level drops, and the fill valve wakes to restore it. That cycle explains the ghostly refill sound, and anyone tracing it will often find that learning to replace a toilet flapper cleanly and calmly resolves the whole disturbance, since fitting a fresh seal removes the leak path entirely.
Other suspects deserve a look before any part gets blamed. A fill valve that fails to shut fully can send water over the overflow tube in a steady trickle, producing a similar refill pattern with a healthy seal. A chain that hangs too short can hold the seal slightly raised, while a chain tangled around the flush arm can stop it settling at all. Hairline cracks in the overflow tube, though uncommon, let water drain away below the intended level. Working through each candidate in order, with the lid off and a torch handy, turns a mysterious noise into a short list of visible faults that can each be confirmed or cleared.
Sound gives an early clue about timing as well. A refill that arrives at regular intervals through the night suggests a steady, predictable leak rate, while random short bursts can follow small changes in household pressure as other taps open and close. Noting when the sound happens, and whether anyone used water elsewhere in the home just before, sharpens the picture before any tool appears. A notebook by the bathroom door for one evening may sound excessive, yet patterns recorded honestly beat impressions remembered loosely, and the eventual fix becomes easier to prove once silence finally replaces those noted interruptions.
Testing the Flapper, Fill Valve, and Overflow Level
A colour test remains the simplest way to prove a leaking seal. Add a few drops of food colouring or a dark drink to the tank water, leave the toilet completely alone for a while, and then look into the bowl. Colour appearing in the bowl without any flush means water crossed the seal on its own. A clear bowl points attention upward toward the fill valve and overflow instead. Pressing gently down on the seal by hand during a refill also helps, because a refill that stops under light pressure confirms the seal as the escape route. These checks cost nothing and prevent the waste of replacing sound parts on suspicion alone.
General background helps frame what each part should be doing, and an overview of how flushing toilets move water through bowl and tank explains why the tank refills after every flush and then should rest completely still. With that picture in mind, watch the water line against the mark inside the tank or against the overflow rim. Water sitting above that line will spill silently down the overflow, while water well below it can leave a weak flush and repeated topping up. Listening matters too, since a hissing fill valve that never fully rests signals internal wear, whereas silence followed by a sudden short refill points back to slow leakage at the base.
Adjusting Chain Slack and Water Level Inside the Tank
Chain adjustment takes moments and solves a surprising share of phantom refills. The chain linking the flush handle to the seal needs a small amount of slack when the seal is closed, enough that the seal can settle under its own weight, yet not so much loose chain that links slip beneath the seal and prop it open. Unhooking and refitting the chain one link at a time gives fine control, and testing several flushes after each change shows whether the seal drops squarely every time. A chain that floats or twists may need its float position shifted or its excess length clipped back neatly.
Water level adjustment sits at the fill valve, either through a screw on top of the valve or a clip that slides along a float arm, depending on design. Raising or lowering the float by a small amount changes where filling stops, and the correct resting point sits just beneath the overflow rim. Shutting off the supply valve and working with a dry tank makes every adjustment calmer, since hands stay dry, parts stay visible, and no refill interrupts concentration halfway through a fiddly clip. After any change, restore the supply, let the tank fill fully, and wait long enough to confirm the valve closes and stays closed.
Mineral deposits complicate adjustment in hard water homes, because crust around the float or inside the valve can hold moving parts slightly away from their resting position. Wiping deposits gently from accessible surfaces and moving the float through its full travel by hand reveals sticking points that simple adjustment cannot cure. Vinegar on a cloth softens light deposits without harsh chemicals near drinking water pathways, though heavily encrusted valves often respond better to replacement than to repeated cleaning. Treating deposits as part of the diagnosis, rather than an annoyance beside it, explains why a toilet can drift out of adjustment gradually even though nobody has touched its settings for years.
Replacing Worn Components Without Removing the Whole Unit
Most tank parts unclip, unscrew, or lift away without disturbing the bowl or the water connection beyond the supply valve. A replacement seal usually unhooks from two pegs and presses onto the same points, while fill valves often release with a single nut beneath the tank once the supply line is loosened. Keeping a towel and a shallow container under the work area catches the small amount of water that escapes from lines and sponges. Photographing the original arrangement before removal gives a reference for chain routing and float position, and laying old parts beside new ones confirms sizing before anything gets fitted in haste.
Choosing replacement parts with efficiency in mind protects both performance and water use over the following years. Guidance published through the Environmental Protection Agency WaterSense programme for efficient fixtures sets criteria for toilets and components that use less water while still flushing effectively, and looking for that label simplifies choosing between otherwise similar parts on a shelf. Matching the seal size to the flush outlet matters more than brand, since an undersized seal will leak from its first day. After fitting, several test flushes should follow, watching the seal seat, listening for hissing, and checking beneath the tank and around the supply connection for any dampness.
Checking Whether the Bowl Refills Properly After Repairs
A repaired toilet should fill the bowl to its normal level as the tank refills, because a small refill tube directs water through the overflow during filling for exactly that purpose. If the bowl sits low after repairs, that tube may have slipped off its clip or become blocked, leaving a shallow bowl that flushes weakly and invites double flushing. Repositioning the tube so it points down the overflow without sitting below the tank water line restores the balance. Watching one complete cycle from flush to full rest confirms that bowl and tank each reach their intended level and then stay perfectly still together.
Final checks extend beyond a single successful flush. Return after an hour and again the following morning to listen for any refill sound and to feel beneath the tank for moisture around bolts and connections. A dry tissue wiped around each joint reveals slow seepage that fingers might miss. The water meter, where one is fitted and readable, offers a further confirmation when no other water runs in the home. Keeping the old but serviceable parts as spares, clearly labelled, also helps future diagnosis. When silence holds through the night and the bowl level stays steady, the repair can be considered complete and the lid replaced with confidence.
Why does the toilet refill briefly every so often without being flushed?
That pattern almost always means water is leaving the tank slowly, either past the seal at the base or down the overflow tube, so the fill valve wakes to restore the level. The colour test described earlier separates the two causes reliably. Once the level stops falling, the refill cycles stop with it.
Can a worn seal really waste much water?
Yes, because a slow leak runs all day and all night without pause, and even a thin trickle adds up across weeks of constant flow. The exact amount varies with the size of the gap and household water pressure, so no single figure applies everywhere. Fixing the seal promptly keeps that quiet waste from continuing unnoticed.
Should the whole toilet be replaced when refills keep happening?
Almost never for this fault alone, because the parts that cause phantom refills sit inside the tank and are designed to be replaced individually. Replacement of the full unit only makes sense when porcelain is cracked, the outlet is damaged, or repeated part failures point to a deeper design problem. Tank repairs preserve a sound toilet at a fraction of the disruption.
How long should a repair take for a first attempt?
Allow a relaxed stretch of time rather than rushing, since diagnosis, adjustment, and testing each deserve attention. Most single part swaps are straightforward once the water is off and the tank is drained. Extra time spent watching test flushes is never wasted, because it confirms the fault has truly gone before the lid goes back on.


One comment