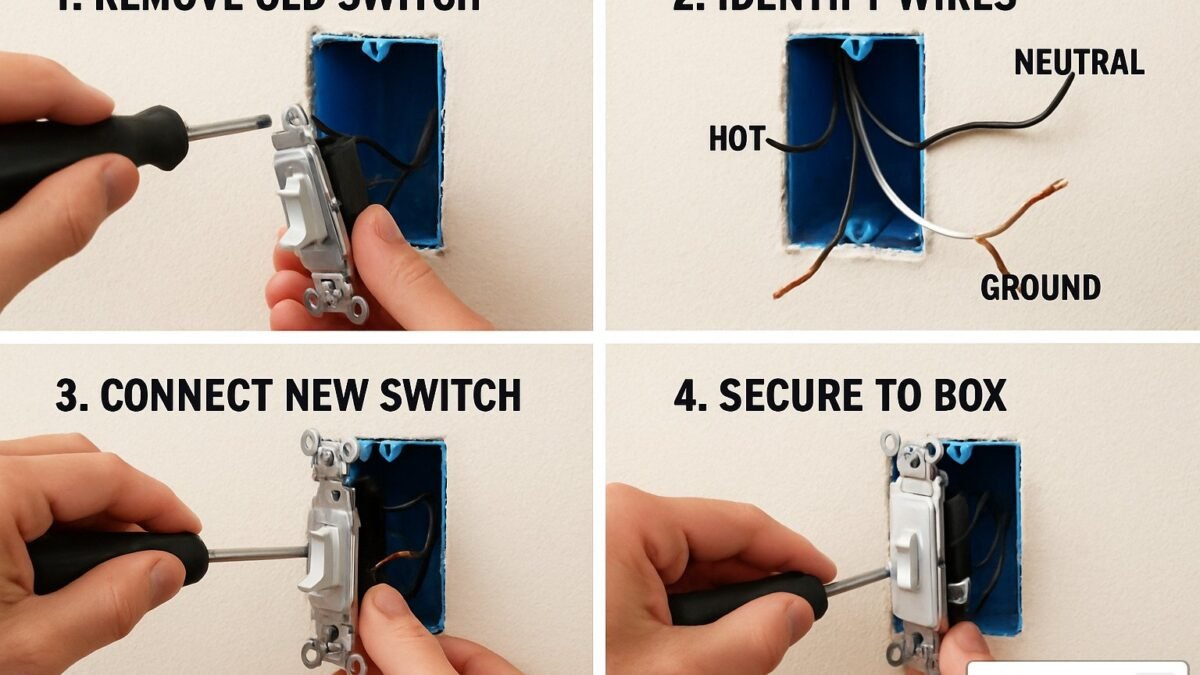
Swapping a tired wall switch looks like a tiny job, and in many homes it genuinely is, provided respect comes before speed. The wiring inside a small box deserves the same caution given to any live circuit. Beginners succeed when they treat the work as a sequence of verified pauses rather than a race. Power gets isolated, that isolation gets proven, and only then do hands meet metal. Followed patiently, the sequence protects both the person and the house.
Phase One Is Choosing the Matching Replacement
Start by naming what the old switch actually does, because a control that works a light from one place only is a very different part from one that shares the job with a second control down a hallway. A like for like swap stays within the first kind, where a single control opens and shuts one path for current. Look at the face of the old part while it still sits in place, note whether the paddle or toggle feels loose, cracked or stiff, and decide on a replacement with the same job and the same rating rather than a part that merely looks similar on the shelf.
Shops lay out many near twins, and the small print on the box is what separates them. Match the voltage and current rating to the old part, choose a finish that suits the room, and favour a solid body with firm screw terminals over the cheapest loose item in a bin. A switch gets pressed thousands of times across its life, so a slightly better made body repays its modest extra cost every single day. Keep the receipt until the job is proven.
Beginners in any practical skill stumble in predictable places, and avoiding the biggest mistakes with keyboard shortcuts shows the same pattern of learning the safe sequence before chasing speed. Buying comes after understanding here as well. Gather the tools before opening anything, including screwdrivers that fit the screws well, a non contact tester in working order, a torch for a dark box, tape for labels, and a phone for photographs. Lay them within reach so no step gets improvised halfway through with the box already open.
Phase Two Is Isolating Power and Testing for Silence
Turn the light on first, so its state tells you something useful, then walk to the panel and move the breaker that should feed that room to its off position. Return and try the switch several times. The light should stay dark, yet a dark light alone proves nothing, because a failed bulb or a loose fitting can imitate a dead circuit. Panel labels guide the search, but labels get written carelessly, changed during renovations, and trusted far beyond what they deserve.
The Wikipedia overview of circuit breakers explains that how a breaker isolates a branch circuit when it trips or gets switched off at the panel. That isolation is the foundation of the whole job, and it still needs proof at the point of work. Remove the cover plate slowly, set its screws aside somewhere safe, and keep hands away from any bare metal until testing is complete. The box may hold more than one circuit, so silence on one wire says nothing certain about its neighbours.
Bring the tester near each terminal and each exposed wire end in turn, holding it close without forcing it into the cluster. A sound tester stays quiet and dark on a truly dead circuit. Before trusting that silence, check the tester against a socket you know is live, then check it again after the box testing, so a flat battery or a failed unit cannot masquerade as safety. This double check takes moments and is the difference between evidence and hope.
If any wire makes the tester sing, stop, step back, and return to the panel to find the other breaker involved. If no breaker produces complete silence, the job ends there for the day. Only a silent tester on every point, checked twice, earns the next phase.
Phase Three Is Recording the Existing Wire Layout
With silence proven, resist the urge to loosen anything at once. Take clear photographs from straight on and from each side, close enough that colours, positions and screw choices can be read later on a larger screen. Photograph the back of the old switch as it emerges as well, because the relationship between wires often reads more clearly outside the box than inside it. A short written note beside the photographs, naming top and bottom and left and right, removes doubt if the pictures later confuse you.
Now ease the mounting screws out and draw the switch forward gently, letting the stiff wires unfold at their own pace. Forcing them risks cracking older insulation or pulling a hidden joint apart inside the box. Study what you find with patience. On a plain single control you expect a small set of conductors landed on the main terminals, plus a grounding wire fixed to its own green terminal. Other wires may pass through the box joined together in a connector, playing no part in the switch itself, and they should stay exactly as they are.
Labelling turns memory into something physical. Wrap a small piece of tape around each wire before it moves and write its position on the tape in plain words. One wire at a time will move later, and the labels guard against the moment when two similar ends hang loose and look identical. Colours help, yet colours vary between homes and eras, so position labels carry more weight than colour assumptions. Treat the photographs and labels as a map drawn by the person who last wired the box correctly.
This is also the honest inspection point, and stopping here is a success rather than a failure. Call a licensed electrician and go no further if insulation crumbles or flakes when touched, if pale silvery aluminium conductors appear instead of copper, if scorch marks or melted plastic show anywhere, or if the layout simply cannot be matched to anything you expected. Heat damage and unfamiliar wiring describe problems larger than a tired switch, and they need diagnosis before any new part goes in.
Phase Four Is Moving Each Wire With Care
Move slowly and handle a single conductor at a time, leaving every other wire landed until its turn comes. Loosen the first terminal screw just enough to free the loop, lift the end clear, and shape its hook so it sits neatly around the matching screw on the replacement. The Wikipedia overview of light switches describes terminal layout and on and off markings on a basic single pole switch, which has two main terminals plus a grounding terminal. Hooks should curl in the same direction the screw turns, so tightening draws the wire inward instead of pushing it away.
Tighten each screw until the wire feels firmly gripped, then pull on that wire with a steady tug. Nothing should slide, rotate or creep. A loose end under a screw can arc in use, build heat inside a closed box, and undo all the care taken earlier, so the tug check matters as much as the tightening itself. Prefer the screw terminals even when push in holes on the back look quicker, since a clamped loop under a screw can be inspected, tightened and trusted in a way a hidden spring grip cannot.
Land the grounding wire on the green terminal with the same care, because that path protects people when a fault sends current somewhere it should never go. Keep bare ends from touching neighbouring terminals, keep insulation up close to each screw without trapping it under the screw, and keep the inside of the box as orderly as the layout allows. If a wire end looks nicked, darkened or thinned where it was gripped before, pause and consider whether trimming back to bright metal is within your confidence. If it is not, that uncertainty is itself a reason to stop and bring in an electrician.
Work through every conductor this way until the replacement carries the full set, each one photographed, labelled, tugged and compared against the record from the previous phase. Compare the finished back of the new switch with the photographs of the old one, terminal by terminal, before anything returns to the wall. A mismatch spotted now costs a minute. The same mismatch sealed behind a cover plate could cost the whole job, or far worse, so this comparison is a fixed step and never an optional courtesy.
Phase Five Is Restoring Power and Watching Closely
Ease the wiring back into the box with soft bends, like a ribbon settling into a drawer, rather than stuffing them behind the switch body. Seat the switch evenly, drive its mounting screws until snug without straining the fixing lugs, and fit the cover plate so it sits flat without pinching anything. Before restoring anything, sweep the area for stray offcuts, put tools away from the panel, and tell anyone in the house that the power is about to return so nobody gets a surprise elsewhere.
At the panel, stand to one side, look away slightly, and move the breaker back on with a firm single motion. Return to the room and work the new switch through a slow series of on and off cycles. The light should answer crisply every time, with a clean action in the control itself and no delay, flutter or dimming that was not there before. Leave the light running for a while afterwards, because some faults announce themselves slowly rather than at the first touch.
Watch and listen during that first period of use with deliberate attention. A healthy switch stays cool, silent and boring. Warmth on the plate, a faint buzzing, a crackle during movement, a smell like hot dust or scorched plastic, or any flicker in the lamp all mean the same response. Switch off at the breaker, leave the circuit off, and have the installation examined rather than opening and adjusting it repeatedly on hope. Repeated guessing inside a box that has already warned you is how small faults grow teeth.
Finish by updating the panel label if the old wording proved vague or wrong, so the next person inherits better information than you did. Store the photographs with a note of the date and the part fitted, since that record will serve every later switch in the same house. Then let the job settle into ordinary use, with one last check of the plate for warmth later that evening. Done in this order, with proof at every pause, a simple swap stays what it should be, a quiet improvement handled safely from first touch to last.